
Firstly, Olga is the winner of this week's contest, "Name that Bust." The bust was Hemingway who modeled the recent Debbie Bliss baby hat (tee hee, Papa must have been cringing up above!). Second prize goes to Julia for playing along with a good guess or two in my very first blog contest. If you two send me your mailing addresses to kodachromeknits AT yahoo DOT com, I will send out the wee prizes to you soon. Thanks for playing! (EDIT: I received your email, Olga. Gracie!)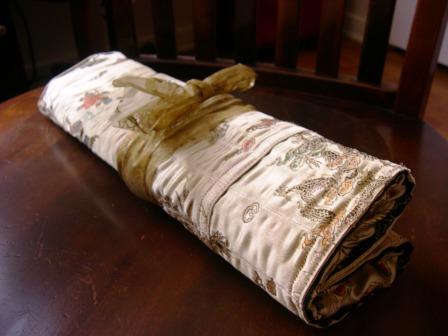 Secondly, Olga mentioned on her blog recently the needleroll case I had made, and I, with much embarrassment, realized that I never really did explain how I made it (despite saying I would). So for the many (not really!) who would like to know how I made it, here is as good as a tutorial as I can muster...
 The needleroll is essential two placemats, one folded inside the other. So, you'll need two placemats, of appropriate size and weight (you don't want anything too flimsy). Two dishtowels will stand in for models, here:
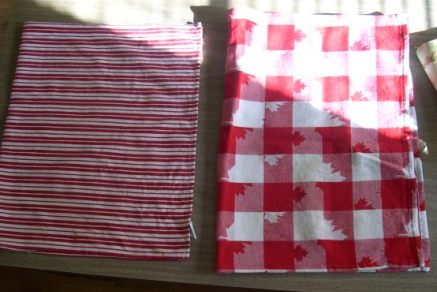 Place one placemat/teatowel within the other, folding it where you deem appropriate for the holding of your needles and knitting tools. You need to decide how deep you want the two sets of pockets (outside and inside pockets) that the outer placemat (the striped towel) will create.
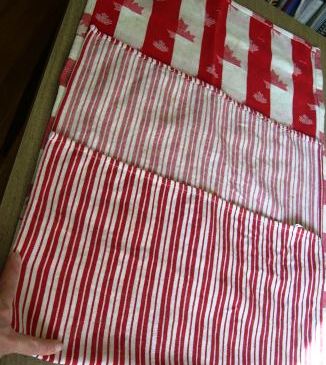
Leave, if possible, enough material on the bottom placemat (the checkered towel) to make a top flap so that it will fold down to cover the needles once they are inside (my original doesn't have this and I wish it did):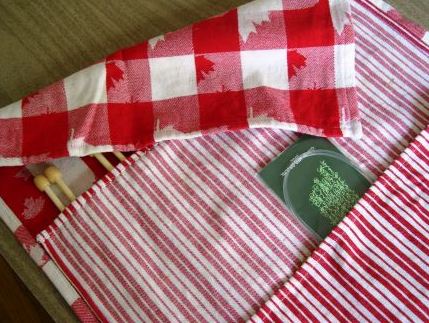
Once you've measured (using your needles and tools) where you want the placemat on top (the striped one) to be positioned, leave it in place but unfold it (the stripped one in the photo--fold the flap down now). Now you want to stitch up the two outer sides of both placemats, thereby joining the two placemats together along the edges, and then stitch along the bottom edges (but the striped "flap" is still hanging down so you're actually sewing across the striped one now, creating a seam through it. You'll fold this flap of the striped towel back up later, when it's time to make the outer, wider pockets. But for now, we're making the back slots for your longer needles and so that flap [for the outer pockets] doesn't come into play for a bit).
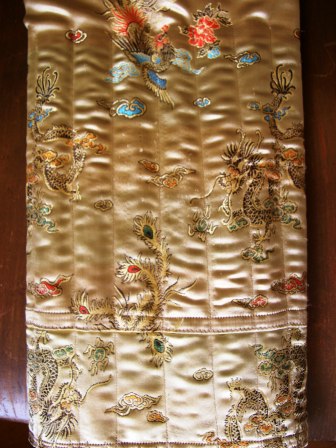
A 'reminder' photo of what the roll looks like in completion...
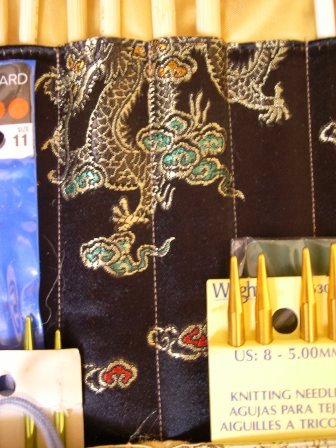
After the center seam is made, measure how wide you want each "slot" to be, using your knitting needles to do so. Then sew a seam up each marked slot, again, starting at the bottom seam and sewing just to the top of the folded up placemat (the striped teatowel in the 'tutorial' version). I believe I made 6 seams (=7 slots) on each side of the center line. Here's a close-up of the seams that I'm speaking of that hold the back needles in:
 Once you've done this and have made long narrow slots for your longer needles, you now want to make the larger (wider but shorter) outer pockets. Fold up the flap of the stripped towel (the outer placemat's flap that has been hanging down this entire time) , and stitch the outer seams of it so that it now is also attached to the back placemat (so you essentially are stitching over the same seam that you first made when first attaching the two placemats together).
Now, using the back center seam as a guide, stitch up the same center seam, making sure to stop at the top of the folded flap. Now, decide how many outer pockets you want, and then stitch up along the same seams as the back slots. For instance, I have four wider pockets on the outside (two on each side of the center seam) and so once I made the center seam for the outer pockets, I simply sewed one more seam up the left side, and one more seam up the right side. *Be sure to sew these seams on top of the back seams of the slots so that you don't mess up the back pockets' slots.* I simply counted three (back slot) seams to the right, and then sewed up that one, and did the same for the left side. [*Remember, you need to be able to slide your longer needles all the way down these back slots so any seams that you sew on the outer pockets have to match the back seams so as not to interfere with the 'original' slots].
Here's a picture of the backside once done:
I then simply folded both outer sides into the middle, and then folded it down the middle.

To keep it closed, I simply wrap it with a ribbon.

Ok, now that I've tried to explain this construction, I have a new-found appreciation for technical writers and those who carefully and in great detail document the process of their creative projects. In this shabby tutorial, I found myself needing more photos to show what I meant but unfortuantely the photography happens at home, and the blogging happens at work (and never the two shall meet). So, here at work doing the writing portion of this tutorial, I found myself incredibly frustated b/c I realized I should have taken different photos showing different things. If anyone is confused by this tutorial (I sure am!), please let me know and I'll try to be more specific or clearer in my instructions as to what I did.


|